Extremely simple VPN (SSH tunnel)

Links to great tutorials and original contributions.
Don't know how to setup your VPN ? How to install a panel ? How to tweak yout VPS ? Check here and ask if you don't find what you are looking for.
Post Reply
Admin
Site Admin
Posts: 490
Joined: Wed Jul 25, 2012 10:54 pm

Extremely simple VPN (SSH tunnel)

Post by Admin » Sun Aug 12, 2012 5:10 pm

We already have PPTP and OpenVPN tutorials here, but I heard that in some restricted environments they might not work (especially PPTP), for example if you are behing a badly of restrictively configured router.
I want to give you here the ultimate solution that will work in all cases, speciffically the SSH tunnel over port 80.
*WARNING* Be aware that you will no longer be able to run a webserver on your VPS, so you should pick a plan only for VPN, the 50cents one will work. However, at some point, we will test if it works on port 22 (default SSH) and if it does, then you dont have to move it to port 80 and block any HTTP server.

SSH works by default on any linux VPS plan, therefore you may not need to do anything on the server and this is good news for linux newbies. Keeping your distribution up to date is strongly advised, though (see the section about security).
Now we will use an application called tunellier, it will establish a VPN for us and is a simple graphical tool (tho it has many options and we will turn most of them off).
We will need the data in the provisioning mail, will look something like this: Image
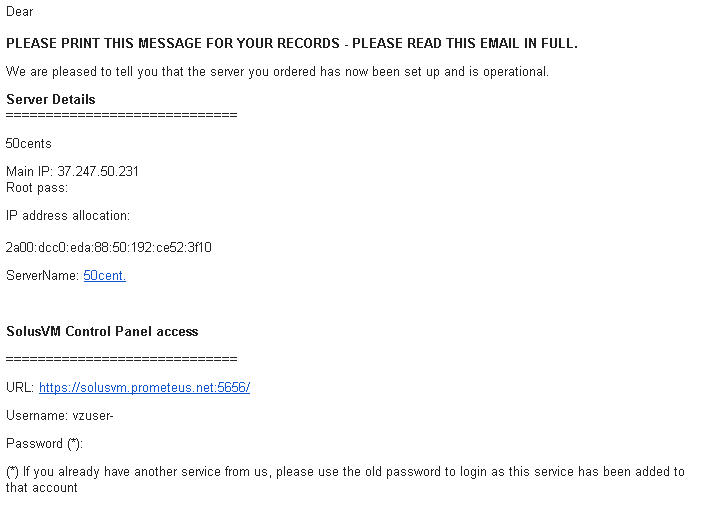
Locate your IP and root password, this is all we need for now.
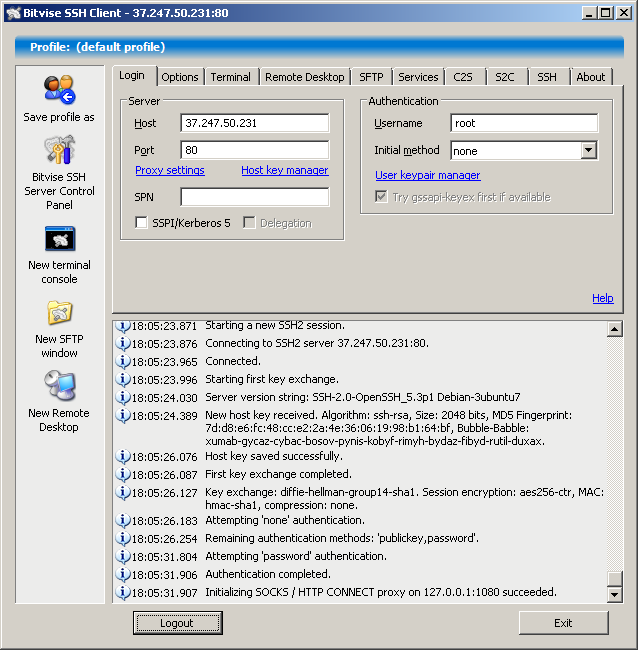
Download the tunellier aaplication (made by bitwise, it is free): http://www.bitvise.com/download-area
Make sure to get the client, first one, not the server.
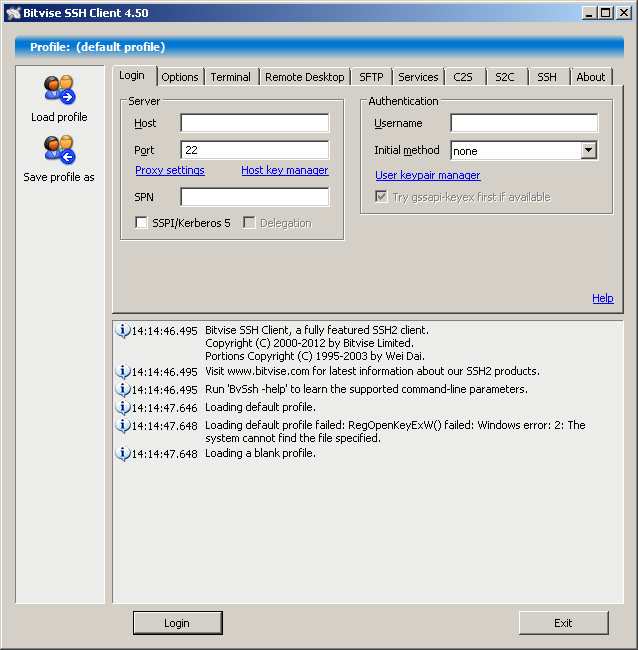
Install (you only have to check the I Accept... box and click install) and it will automaticaly start: Image
Now we dont need all features, so we will disable some:
Go to options and uncheck at the right On login panel everything.
Then we need to enable proxy:
Go to services and in the right panel click check the enable box at socks/http proxy (you can leave the other settings default):Image
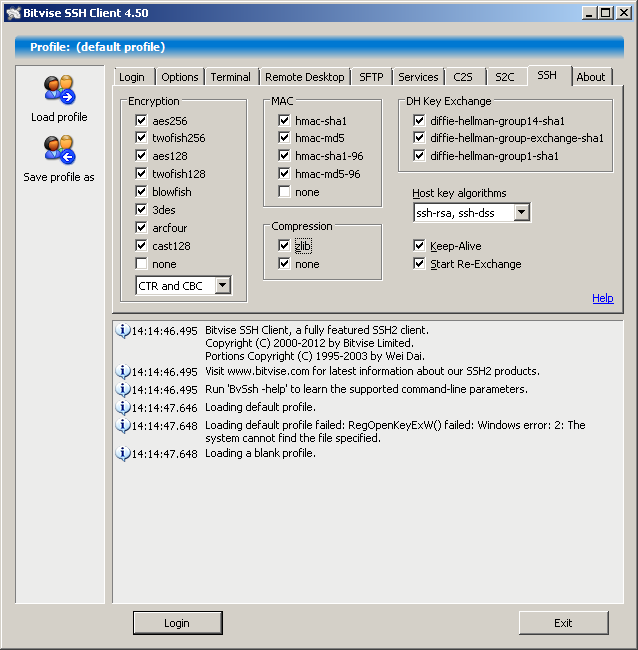
And compression to speed up things on a slow connection in the SSH tab:Image
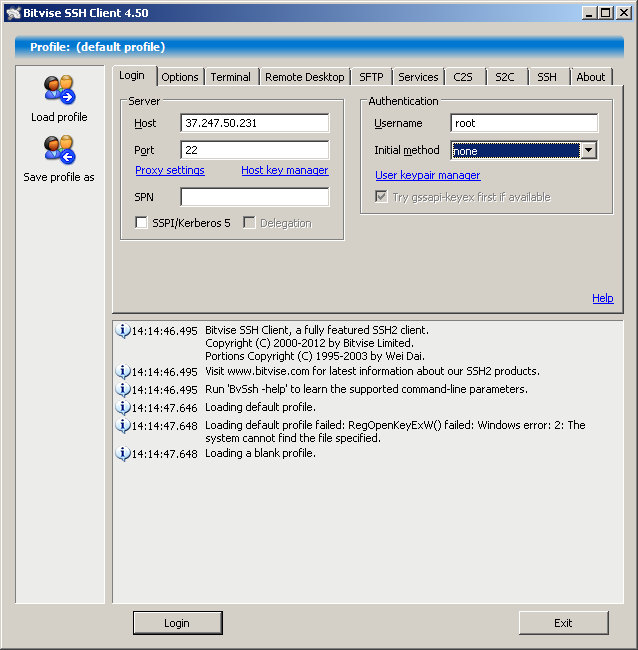
Should be ok with settings, now return to the first panel:Image
and introduce your IP and username (root):
Image and save profile by clicking the save profile as button at the left.
We are now ready to connect. Click login !
You will have to accept and save the key:
Image
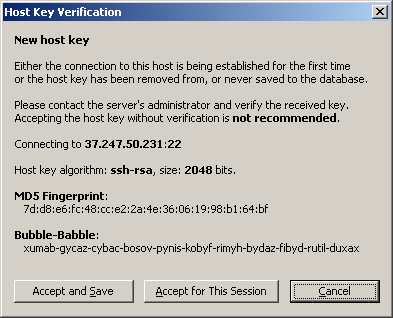
but this is only at the first connect, next time wont ask again unless you reinstall the VPS or connect to another.
Now will ask for your password (the root password), introduce it and login, we now have a VPN connected.
In order to use it, we need to configure our software (browsers and other programs that support socks proxy) to use it.
I would use a separate browser for the proxy, for example, download and install mozilla firefox from http://www.mozilla.com.
I will show you how to configure this particular browser to use the VPN, it is similar in other browsers, but not exactly the same.
Go to tools>options>advanced>network>settings (if you dont see the menu, right-click to the right of the tab and click menu bar)
Image
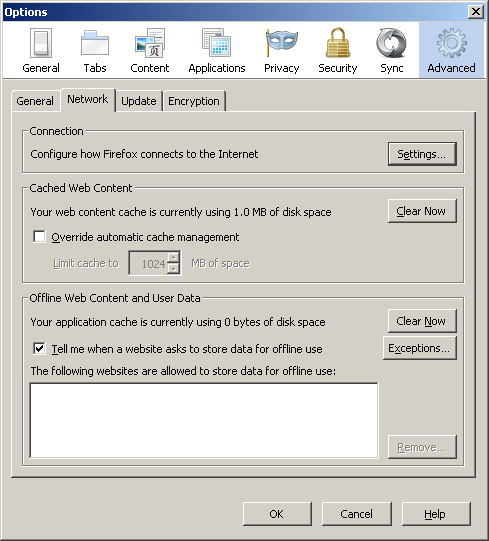
and make it look like this:
Image
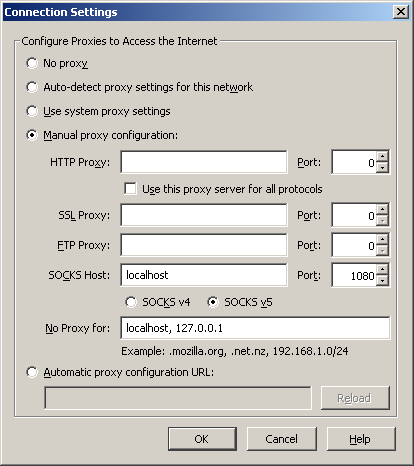
OK, save everything and should be set.
Go to http://www.whatismyip.com (or another site for that matter with similar function) and if in the next picture you see the IP of your VPS like this:
Image
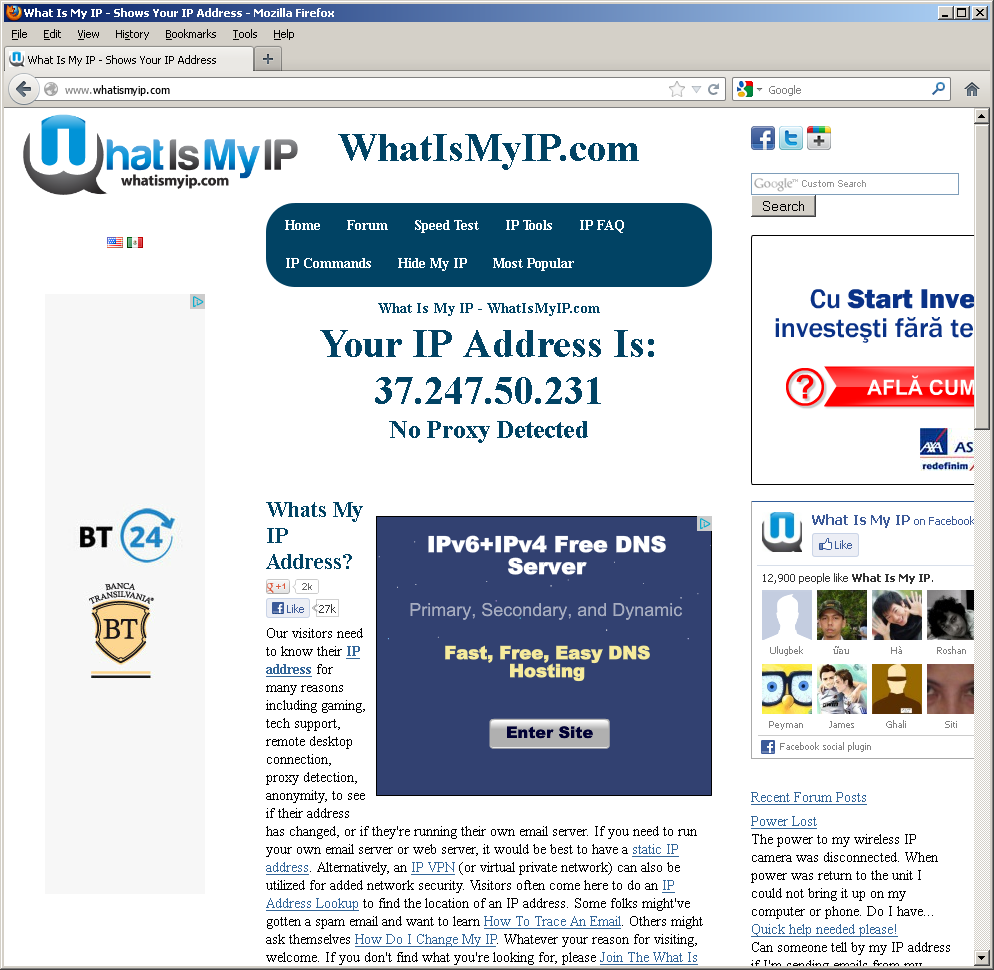
then you are successful ! You can browse the internet using your Italian IP at the cost of 50 cents a month... You can use other applications too, make them connect through socks proxy on localhost port 1080. It is also HTTP proxy, if your application does not support SOCKS. Be aware you have only 50 GB of traffic with the 50 cents plan which should be more than enough for browsing and even watching movies online, but not enough for P2P (illegal sharing will not be allowed, though).
Since the data is compressed, you will be able to increase your connection's speed if you have a slow one (to Europe at least):
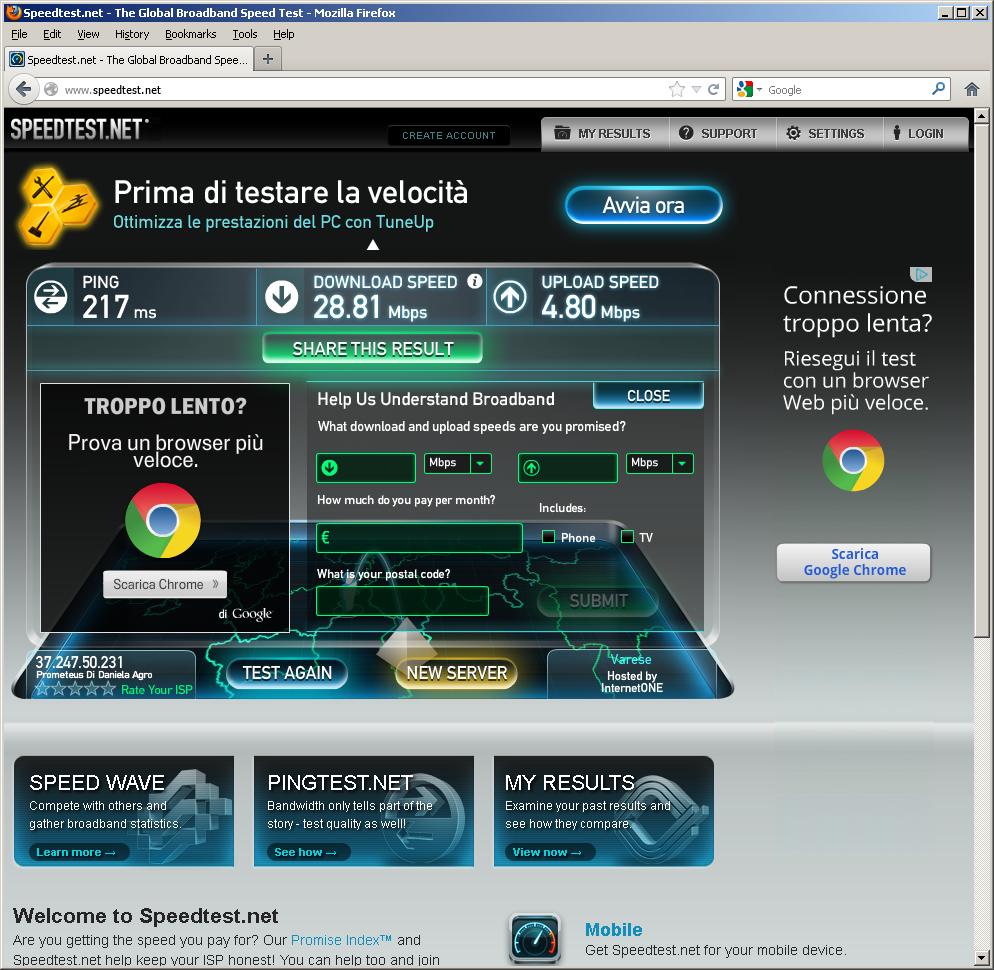
Image.
On the other hand, ping will increase because it travels longer and, as such, this is not suitable for playing fast games.

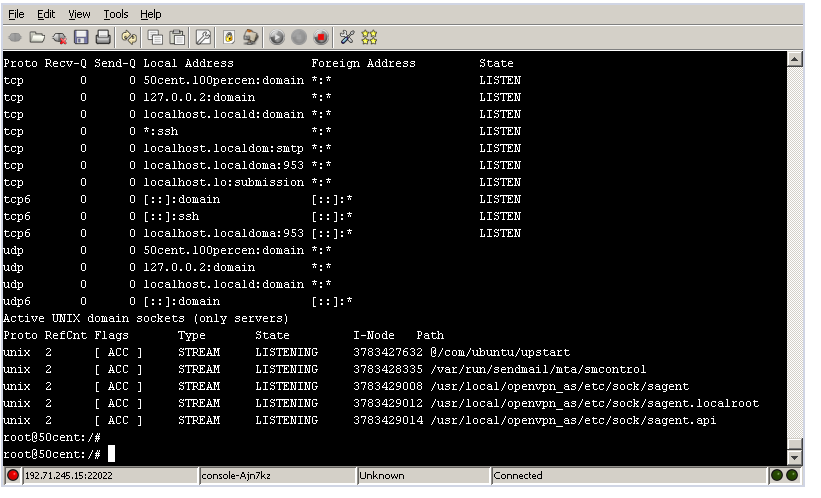
If it worked so far, great ! You can use your vps for hosting some content too (for example to link to this tutorial so others will benefit), but if it doesnt work and tunnelier cannot connect because port 22 is blocked, read the second part. We will move the connection on port 80. The next part involves some linux intervention, some command line action, but i will explain it at a very basic level and give commands in full so you only need to copy/paste them.
Read on the reply to this below.

Admin

Admin
Site Admin
Posts: 490
Joined: Wed Jul 25, 2012 10:54 pm

Re: Extremely simple VPN (SSH tunnel)

Post by Admin » Sun Aug 12, 2012 7:24 pm

OK, so you are out of luck and port 22 is blocked in your network.
As long as you can browse the internet, it means that port 80 is open, as such, to be sure, we will use that one to establish our VPN connection (if you don't know what ports are, doesn't matter, you can still do it).
We will need to make some changes to the linux VPS and we can't do them in the network that blocks port 22 because will not let us to connect.
But we can connect to our SolusVM control panel and use a special applet there called console.
Notice in your email the link to SolusVM: https://solusvm.prometeus.net:5656/ your user and password (vzuser-somenumberhere and the password is right below it in the email).
Let's connect:
Image
After you connect, you will see your VPS there, click manage and you will see a screen where you go below and select Console password and type your password like this:
Image
Click change and you will see a green message Console password updated. Do not use strange characters such as %,#, (,), space etc because it may not work, somehing like 123MyconspaSS will be ok.
Now click the serial console button at the left and depending of you may need to allow the java applet to run. If you dont have java installed, go to http://www.java.com and install making sure you uncheck any other "add-on" it offers you for "free".
Always remember, if you move between sceens to read this tutorial and type in console, that you need to click the console after each move to activate it, otherwise will not receive your typing.
You should now have the login like this:
Image
Do not modify the user ! You will have a different one than in the picture. Only insert password.
This tutorial is for Debian/Ubuntu, if you have another distribution you selected at ordering, you should go to SolusVM panel and click reinstall, choose debian 6 32 bit and install it.
You need to do these commands:

Code: Select all

apt-get update

Code: Select all

apt-get upgrade
Answer yes (y) at all questions and let it finish.
At the end do:

Code: Select all

apt-get remove apache2*
and answer yes. Then again for

Code: Select all

apt-get remove samba*
If it gives an error about not installed at any, no problem it is ok, otherwise answer yes to all questions. After it is done, do:

Code: Select all

init 6
to restart. Give it a break to restart (2 min max) and login again by selecting File>New connection.
After you login,

Code: Select all

netstat -l
Look carefully, if you see anywhere something like this :80, then we are in trouble, it means the webserver is still on, please follow the instructions to reinstall with Debian 32 bit and redo all steps in this second post. Normally it should not be there so we can proceed.
You should have now this:
Image
We need to install an editor that works well in console:

Code: Select all

apt-get install nano
. As usual, say yes to prompts if any. Now again:

Code: Select all

nano /etc/ssh/sshd_config
If it shows an empty file, you probably made a typo, ctrl+x, n if asked and redo more carefully the above code.
Now use your arrow keys to navigate till you see this: Port 22
We need to change to Port 80, like this:
Image
Now CTRL+x answer y and then enter.

Code: Select all

init 6
for reboot
This concludes the changes on the VPS.
Back to tunnelier, we need to change the port to 80 like this:
Image
That is it, click login, save again the key and you are ready to go ! It should connect !
If it doesnt work, please write here with the problem you had. I will adapt the tutorial to reflect that.

Admin

NanoG6
Posts: 28
Joined: Thu Aug 02, 2012 1:25 pm
Contact:

Re: Extremely simple VPN (SSH tunnel)

Post by NanoG6 » Wed Aug 15, 2012 12:54 pm

WOW Admin, I really appreciate your effort to write these tutorials! ;)

Admin
Site Admin
Posts: 490
Joined: Wed Jul 25, 2012 10:54 pm

Re: Extremely simple VPN (SSH tunnel)

Post by Admin » Wed Aug 15, 2012 1:16 pm

Thanks :) I aim to make it easy for everyone, whether they know any Linux or not :)

Admin

jcaleb
Posts: 92
Joined: Fri Aug 03, 2012 8:56 am

Re: Extremely simple VPN (SSH tunnel)

Post by jcaleb » Wed Aug 15, 2012 1:29 pm

Admin's tutorials are on steroids =)

Post Reply

Who is online

Users browsing this forum: No registered users and 15 guests