Since not everyone needs access to CS UI and they only need a robust VM with HA or something like a small dedicated server, we created a special service which offers exactly that. It features fixed minimum resources and extra ones can be billed separately. While billing is broken now, we aim to provide a flexible solution where you can upgrade/downgrade at will. It will be more prepaid than postpaid, similar with a regular VPS.
But, enough talk, let's see how it looks like.
Once you are provisioned with one, you do not need to receive a separate user and password, everything is done from HostBill's client area, click on manage:
You get the main view:

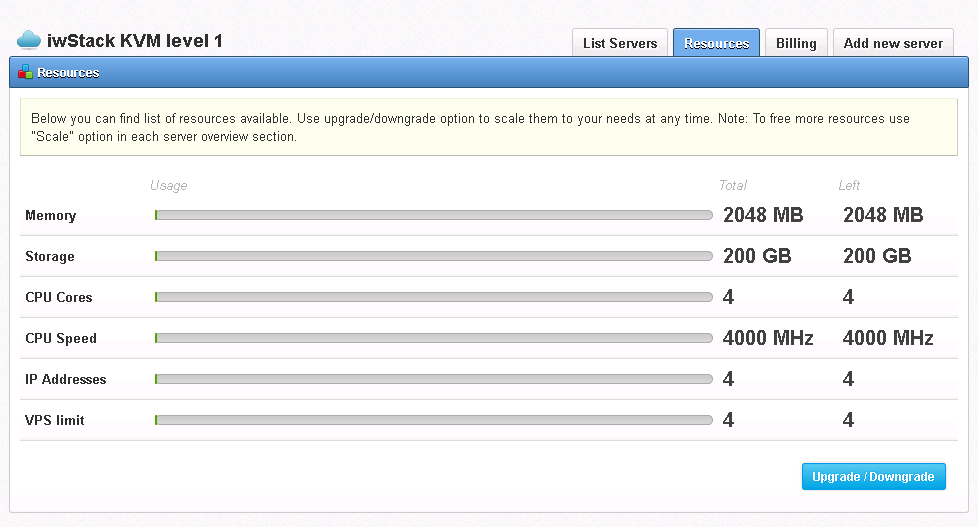
Before clicking on add server, lets look at the resources (they may vary in time and from account to account):
Note: While you will be able to upgrade after billing is working, please dont try it now.
In this case we have 4 VMs maximum with 4 max IPs, 2 GB RAM, 200 GB storage and 4 Ghz of CPU so we could make VMs that will span over those maximum resources.
Some things are fixed, for example, a drive is of minimum 5 GB for ISO install, while, if you install a template, the minimum size is 20 GB (the size of the template) as well as memory, the minimum instance having 512 MB.
Now, lets create our first VM (click on Add New Server):
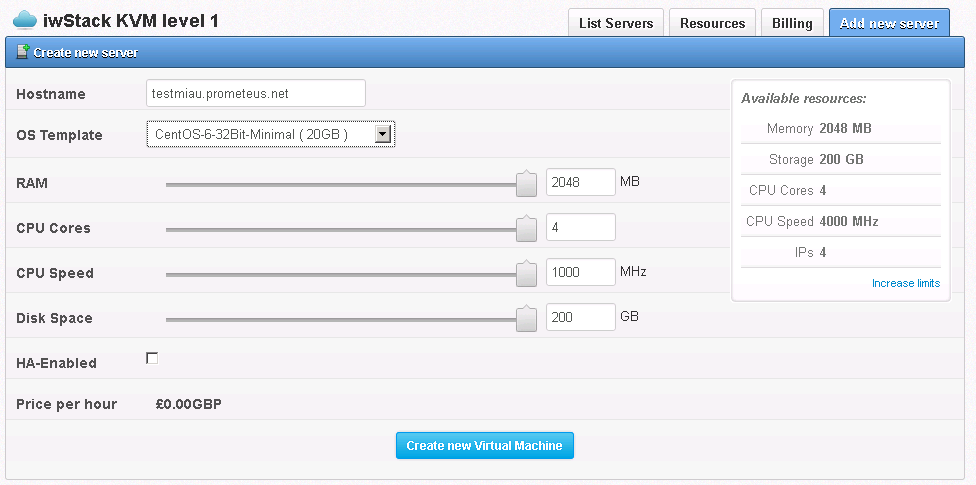
After I filled the hostname. As you can see, all the resources are initially at maximum, it is considered you wist to create one big vm from all available resources.
Let's say I wish to create one with only half of everything, I will adjust the sliders accordingly:
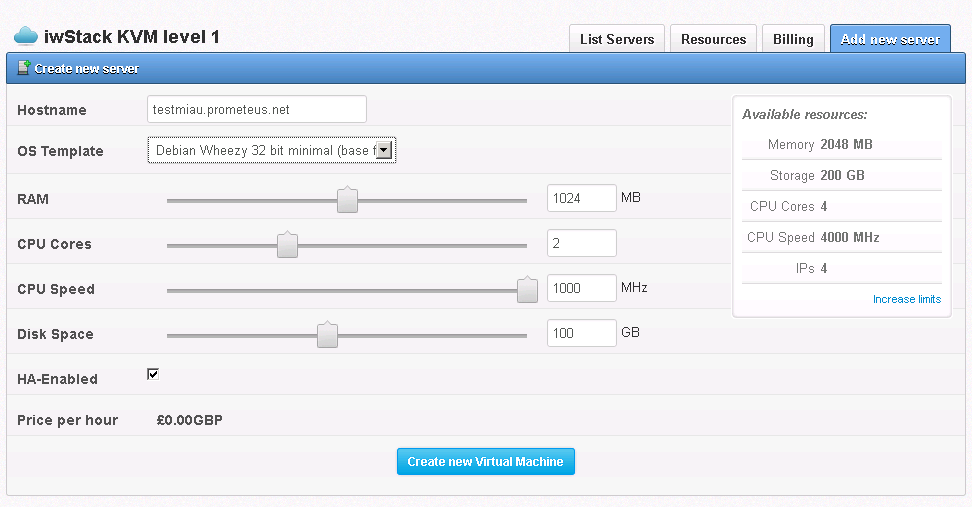
Note a few things:
-CPU can be divided in cores and each core can be given a certain Mhz number. I chose to use 2000 Mhz divided in 2 cores, but I could use 4 cores of 500 Mhz, will use only half of the maximum 2000 Mhz in both cases;
-IPs can't be added on an instance. By default, each has only 1 IP and at least one IPv4. IPv6 only instances are not supported yet;
-You can opt for HA, but you can do as well without. HA is a daemon which checks the consistency of the VMstate with the selected state in the UI. For example, if you shut down the VM from HostBill, it will remain shutdown, if you do from the VM, HA will notice and restart it to bring it in sync with the interface, it is presumed it got off by accident. This is a safety in case the VM crashes for internal reasons, such as a kernel panic;
- I selected a template. Those with size in the name are templates, the others, only ISOs. You will have to select at least 20 GB for the drive if you will deploy a template because that is the size of a template drive. If you select a disk size larger than 20 GB, a data disk for the reminder of the space will be added, so, for a VM built from a template of 20 GB and with a total disk size of 100 GB, the storage will be divided between 2 disks, one of 20 and one of 80 GB.
For ISO install, you can go as low as 5 GB.
Lets proceed with the creation, click on Create new Virtual Machine:

It will take a while to create, it has to dump the template and dd 100 GB of disk(s).
When is done will change from pending to:
 You can use the button to turn it off when you will wish, later on.
Click on the hostname to be brought at the VM admin panel:
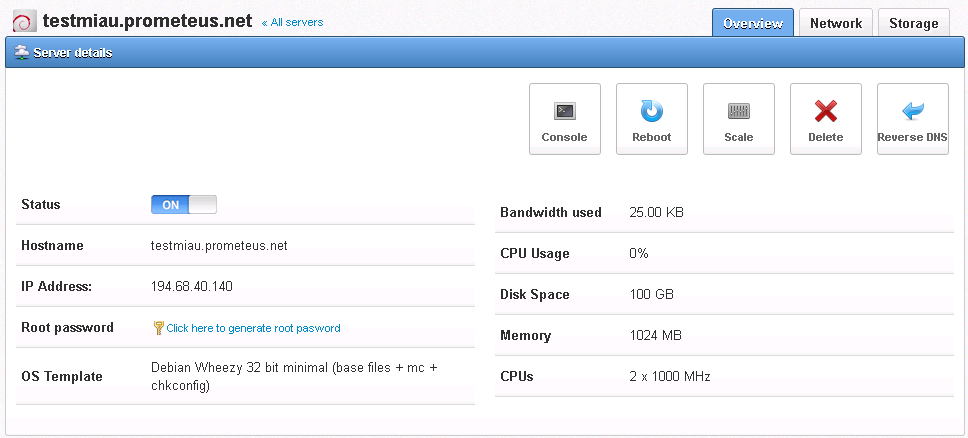
After you created a VM from a template, you will need to reset the root password. This can be done only with the VM in a shutdown state. If you click the link to generate a root password, it will automatically do that, then you will be able to click on the Reset password and power on the vm (please dont rush things, allow it some time to complete the shutdown/boot operations). After you generated the password, a new link will appear to show it. Unlike in the CloudStack-UI, hostbill will remember it.
Note: If you installed from ISO, this will not be available, the VM needs a script to check for the password at start, so you have to install the script in /etc/init.d, make it executable and do
Code: Select all
chkconfig cloud-set-guest-password onCode: Select all
http://board.prometeus.net/myfiles/centos/cloud-set-guest-passwordCode: Select all
chkconfig cloud-set-guest-password offAs you can see, in the upper right corner, a few actions are available, console, reboot, scale, destroy and reverse DNS.
They are self explanatory, with the mention that rDNS does not work yet.
In order to scale the VM, you need to shut it down, the panel will do this automatically if you click scale, after a confirmation dialog.
As you can see, you cannot scale the disk, only the RAM, CPU cores and CPU speed. You can scale the disk by removing/adding data disk(s) only.
There are 3 view types, Overview (we already saw it), Network and Storage, let's go to Network.
The default view is NIC's and it gives some information about your IPv4 (which you can use to find out your IPv6 too, by running this script: http://prometeus.net/returnipv6.php?IP=xxx.xxx.xxx.xxx (replace xxx.xxx.xxx.xxx with your IPv4))
However, we are more interested to set the firewall to allow access to our VM. By default, everything coming from the outside (including ping) is blocked.
Let's suppose we wish to allow access to port 22 (default ssh port) and to be able to ping the VM. This means two rules in the ingress chain (everything is allowed on the egress chain, therefore you do not need to open any port for outgoing connections (from inside VM) so any update, download initiated by the VM, backup, etc, will work out of the box).
Please note: The firewall applies only for IPv4 for now, if you configure IPv6 inside the VM, it will be wide open. To restrict access to it, either make the applications listen only to IPv4, dont set ipv6 or use an internal firewall (inside the VM).
Let's add them:

for TCP port 22 (default SSH) to allow access from all internet (change 0.0.0.0/0 with your subnetif you wish to allow only from some location)

for ICMP ping. You can find some of the ICMP codes here, if you wish to allow other types: http://www.erg.abdn.ac.uk/~gorry/course ... -code.html Same as above, change to your subnet if you wish to allow only from some place.
With that done, lets move to the next tab, Storage:

As you can see, here you can take snapshots of your drive(s) in case you wish to revert at an earlier state. Once you have the snapshots, you can even convert them to templates, so you can clone the VM.
Taking a snapshot is a lenghty process, can take more than half an hour, depending on disk size.
Well, you have the basics now. Please reply to this in case you need more info.
