ATTENTION ! This was for the Beta, the final instructions are here: viewtopic.php?f=8&t=900
Hello !
You are probably here to read about the new storage plans.
A few technical things:
They are on Atoms D525 which have 2 cores with hyperthreading. This obviously means they cannot hold many VPSes and are not suitable for CPU intensive applications.
The drives are Hitachi 2.5 desktop grade without redundancy.
They only have IPv6, one by default, but can offer more if needed.
Here ends the bad news.
Now the good news:
Virtualization is Xen-PV with pygrub which means you can practically load any kernel compiled for DomU.
This, in turn, means you can run any backup software, dont have a need for fancy modules loaded on the host, FUSE or other things like those. CentOS, for example, can host iSCSI targets out of the box.
NFS will also work without crashing the host, and, of course, SMB, CIFS and the family
The default memory (for now) is 192 MB and (also for now) swap space is available, but might be removed if found out to impact performance. Depending on how beta tests are going, memory can be increased and swap removed, but I hope it will work just fine.
There is only one plan for now, 192 MB, 1 core, 100 GB, 1 IPv6, 400 GB.
They are made for Prometeus customers only at this time due to low availability. Proposed price will be 2 Eur a month.
The real HowTo is below
HowTo New storage plans (Beta)
Re: HowTo New storage plans
Hello !
The first thing you will get after signing up for the plan (please dont share the link for betas...) is the welcome email. In the future will contain a lonk to this tutorial, for now looks like this:
PLEASE PRINT THIS MESSAGE FOR YOUR RECORDS - PLEASE READ THIS EMAIL IN FULL.
We are pleased to tell you that the server you ordered has now been set up and is operational.
Server Details
=============================
Test Backup VPS
https://atomic01.prometeus.net/
Username: auxxxxx
Password: xxxxxxxxxxxx
After you login, you will see first your resources tot he right and the Create instance to the left:
Click the Create Xen Instance and you will get to this:
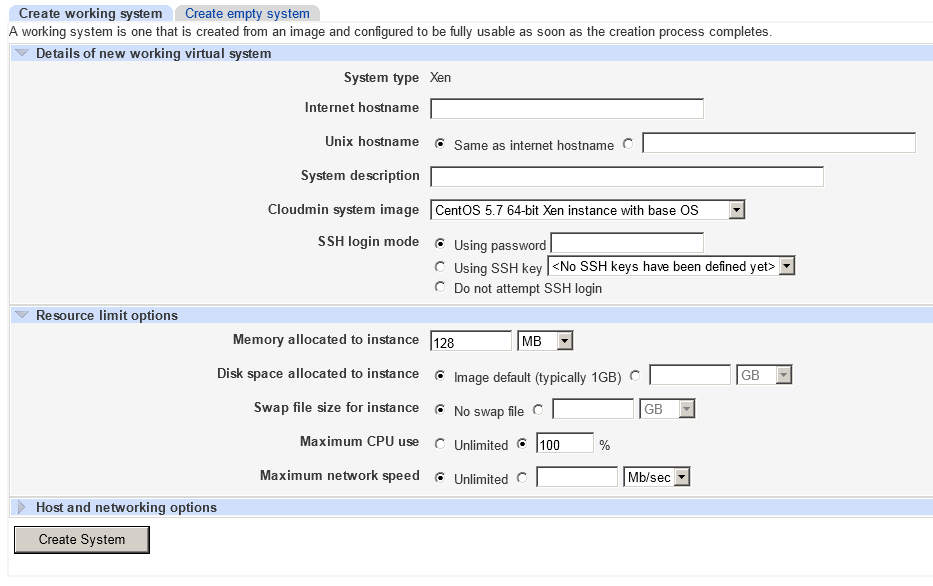
You need to fill in the following fields:
-Internet hostname (has nomeaning as DNSs are not working, you will need to use external ones that support IPv6 (AAAA records) but it must be filled)
-System description which can be anything
-Select a system image from the available ones (this is the OS that will be installed, together with the kernel)
-SSH login mode type your new system's root password (if you know what keys are, you probably shouldnt need to read this tutorial)
-memory allocated (in our case 192 MB for the beta test plan)
-Disk space allocated for the instance (do not leave default as that is 1-2 GB, put all your plan's space (100 GB for this one) minus the space you will use for swap next)
-Swap file size for instance (remember, this field and the above one, must not be more than your allocated resources, or the instance will not be created and you will have to start over because the fields will clear)
-Maximum CPU you may wish to leave as default, it is usefull if you have more systems and wish to divide among them.
-Maximum netowrk speed also should be left untouched as the port is 100 mbps fair share, will not help anything.
DO NOT click Create system ! If you do, the system will not have IPv6 as the default is to be without...
Instead click on Host and Networking options and get this:
You only need to change to Allocate automatic at IPv6 Addresses for Xen instance, and now you can finally create the VPS
If you filled all fields correctly as instructed, the creation process will start. Will take a while and a lot will stay at starting VPS because it tries to see if it is alive pinging it with IPv4 and that is not present, so the VPS will always show as Ping failed in status, this doesnt mean it is down, just that I didnt find a way to make it use IPv6, hope to solve this after beta is over.
You will notice a new panel to the left, like this (I expanded it to show all options):
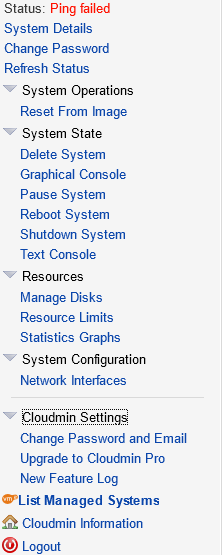
-Reset from image is like reinstall in Solus, the system will be initialized with a fresh system.
-Graphical console is the equivalent of VNC, same is text console, but a bit more rudimentary and easier on resources
-Manage disks opens a powerful menu where you can destroy your data if you dont know what you are doing. The other people dont need explanations
-Resource limits make sense only if you have multiple systems (we are investigating the possibility to allow that in the future), but for now you can only limit yourself artificilly so not a very good idea to play with those, unless you want to see how the system will go with less CPU and ram eventually
-Network interfaces is not very useful now, but we are investigating the possibility to allow multiple ifs, but for a backup plan for testing, that is not needed.
The other otions are either self explanatory, or not needed.
If you have suggestions, problems, requests, please reply here.
M
-
- Posts: 21
- Joined: Thu Aug 02, 2012 2:17 pm
- Contact:
Re: HowTo New storage plans
Thank you for the great tutorial M
Re: HowTo New storage plans
There are things to be added which I am learning from the feedback so far. But that will be tomorrow.
Re: HowTo New storage plans
Perhaps, only offer the backup plans later to existing customers, to avoid abusers. maybe customer that been with prometeus for a month. at least proven record non-abuser
Re: HowTo New storage plans
They are ONLY for Prometeus customers. We can't really limit for how many months should be customers, that will involve manual work.
M
M
Who is online
Users browsing this forum: No registered users and 8 guests